
Hacking Ubuntu Touch, Part 4: Developer mode and ADB
NOTE: This is a continuation of the series, but it does not rely on the previous articles. Thanks to Oliver Grawert for pointing out the bug report regarding the banner string.
NOTE: Most information in this article was reverse-engineered reading the original source code and using strace, tcpdump and WireShark. This is neither a reference nor complete.
UPDATE 15.05.2015: I decided that the serialno field in the CONNECT message cannot be optional.
So you want to become a power user and do something with your phone that is not (yet) possible, or you are an application developer who wants to test his app on the real device. Some of you may try to debug an issue at the core of the device, and a few – like me – want to completely hack the system. Great idea!
The only problem is that Ubuntu Touch devices, like the bq Aquaris E4.5 Ubuntu Edition, are locked down by default for security purposes. The only “standard” way to access the system core is the Terminal app. You don’t want to type all your commands in that tiny little window, and what about transfering system files or automating things? MTP only shares user data via USB, not the rest of the system files or directories. There is no SSH daemon running by default. How do you even install and test your new app on a phone?
Developer mode to the rescue!
Enabling Developer mode
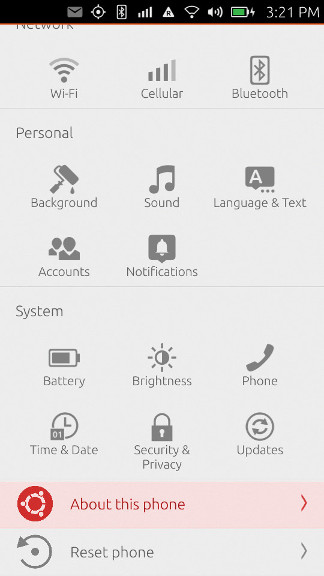
Here’s how to enable Developer mode on current Ubuntu Touch images. Enter System Settings and click/tap on “About this phone”:
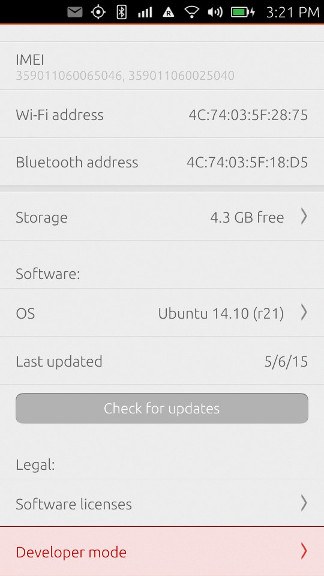
Click/Tap on “Developer mode” at the bottom:
Flip the switch:
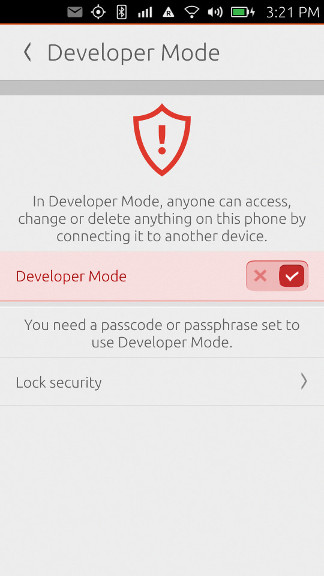
You may have to set a passcode or passphrase if you haven’t already. That’s it, Developer mode is now enabled.
Now what does that even mean? What changed exactly? The answer is short and simple: the device now runs an instance of the /usr/bin/adbd Daemon. Nothing more, nothing less, nothing else. If you already know about ADB, you can skip the rest of this article, but there might be a detail or two you didn’t know yet.
ADB basics
ADB stands for “Android Debug Bridge” and is the standard way to give developers external access to a device, usually via an USB cable. The system has three components and looks a bit complex at first:
-------------------------            -----------------------------------------
|                       |            |                                       |
|           ----------  |  USB/TCP   |  ----------   TCP   ----------        |
| Device    | Daemon |------------------| Server |---------| Client |   Host |
|           ----------  |            |  ----------         ----------        |
|                       |            |                                       |
------------------------- ------------------------------------------
The
/usr/bin/adbd“Daemon” runs on the device and executes all external commands it receives from the server. -
The “Server” runs on the host and interfaces between the client and the daemon. Server and Daemon communicate over a binary wire protocol, usually over raw USB, but optionally also over TCP/IP.
-
The “Client” runs on the host and interfaces with the Server. Server and Client usually communicate via TCP/IP, the default listen port for the Server is localhost:5037.
Why doesn’t the Client talk directly to the Daemon?
-
The Client may not have the necessary rights to access raw USB devices, but the Server might be started under a different user ID and has the rights.
-
There might be more than one Client at the same time, and there would be conflicts when they try to access the same raw USB devices.
-
There are other ways to talk to a the Daemon than the default USB, and it is nice to abstract them away into the Server instead of having to implement them in every Client anew.
The standard implementation for the Server and Client processes is the adb binary provided by the Android Open Source Project (AOSP). Actually the same binary implements both roles: when adb is executed and there is no Server running, it forks itself into the background with the command line adb -P 5037 fork-server server. And if you look at the AOSP source code, you will find out that the standard adbd Daemon and the adb Client/Server binaries share most of their codebase.
When the Server is forked, it scans for attached devices and running emulators and tests if they expose an ADB interface.
The ADB wire protocol
The Daemon and Server talk to each other in a message-based binary wire protocol which is documented here.
If something unexpected happens, like the reception of a garbled message, an unknown command or an unknown parameter, the connection is closed immediately. So you always know when you did something wrong.
There are currently six commands defined, all in the form COMMAND(arg0, arg1, payload), with the payload usually being a string.
CONNECT(version, maxdata, "system-identity-string") is used to tell a remote system that the sender speaks the ADB protocol and is ready. version specifies the maximum protocol version the sender understands, maxdata is the maximum message lenght it will accept, and the payload is supposed to be an identifier string in the format systemtype value is either “bootloader” if the sender is in the Bootloader menu, “device” if the sender has started the Daemon normally, or “host” if the sender is a Server. serialno is mandatory (it is used to identify the device if more than one is present), banner is optional and may contain additional device data, e.g. the banner value on a Nexus 4 is device::ro.product.name=occam;ro.product.model=Nexus 4;ro.product.device=mako. On the bq Aquaris E4.5 Ubuntu Edition it’s currently exactly the same value because of bug 1297927.
Both sides will send a CONNECT message to the other end when the underlying connection is first establised, e.g. when the USB cable is connected and both sides run their respecitve processes.
AUTH(type, 0, "data") is used to authenticate the connection with RSA signatures. I am not too good at cryptography and this step seems to be optional, so if you are interested, please check the original documentation.
OPEN(local-id, 0, "destination") informs the recipient that the sender wants to connect its local stream identified by local-id to the destination identified by the payload string. This sounds a bit complicated, so let’s look at the possible destinations:
tcp:connects to a TCP port, if: hostis omitted then localhost is used.udp:connects to an UDP port, if: hostis omitted then localhost is used.local-dgram:connects to a local datagram socket.local-stream:connects to a local stream socket.shellstarts a shell on the remote device, executes the command and connects STDIN and STDOUT of the started process to the stream.uploadis used to send files.fs-bridgeconnects to the FUSE filesystem bridge. I don’t know the exact details of this one.
READY(local-id, remote-id, "") is the answer to a successful OPEN command. local-id identifies the ID the sender has allocated for this stream, and remote-id is the local-id used in the OPEN command, so the initiator of the OPEN message knows which request is being acknowledged. Since every stream is now identified by an ID on each side, we can multiplex many streams between the two devices at the same time.
WRITE(0, remote-id, "data") sends a string of data to the remote side, intended for the stream identified by remote-id. Note that there is no READ command. The current implementation seems to also use READY messages to acknowlede every write, but it is not defined if the acknowledgement comes as soon as the write has been received or only after the action triggered by the write has been completed.
CLOSE(local-id, remote-id, "") closes the stream identified by local-id and remote-id. This is an unilateral action, both sides each have to send a CLOSE message for the same stream.
SYNC(online, sequence, "") is a purely internal message and never sent across the wire.
An ADB wire protocol example
So what exactly happens on the wire when the Client e.g. tells the Server to open a shell and execute the ls command on the device using the Daemon? Let’s assume the connection has to be fully established for completeness.
-
Server and Daemon send each other
CONNECTmessages. -
The connection is optionally authenticated with
AUTHmessages. -
The Server sends an
OPENmessage to the Daemon and usesshell:lsas the destination. -
The Daemon sends back a
READYmessage and thus acknowledges the stream. -
The Daemon sends a
WRITEmessage and adds the result of thelscommand as the payload. -
The SERVER sends back a
READYmessage to acknowledge theWRITE. -
The Daemon sends a
CLOSEmessage because thelsprocess finished. -
The Server sends a
CLOSEmessage to acknowledge that it also thinks that the stream is now closed.
The Client side protocol
As mentioned in the introduction, the Client and the Server use a different protocol to talk to each other. This protocol is called “smart sockets”. It is ASCII-based and works in two modes:
-
When you connect to the TCP port, you are in “setup mode”. Here you can give commands to the Server, e.g list the devices it knows about, tell it which device you want to talk to, and tell it which destionation on the device you want to talk to.
-
Once you told the Server which device and destination you want to talk to, you are in “stream mode”. A stream has been established to the desired destination and any data you send will now be directly passed to this destination by the Server.
The ASCII protocol looks like this: the Client sends four hex digits, indicating the length of the command, followed by the command string (no trailing newlines or zeroes!). The Server answers with the strings OKAY or FAIL, eventually followed by four hex digits indicating the length of the answer and then the answer. OKAY may return the result of the previous command, FAIL always returns the failure reason.
In “setup mode” the following commands are interpreted:
-
host:versionreturns four hex digits indicating the Server version,001fat the moment of writing. -
host:devicesreturns a list of all detected devices with their serial number and current connection status. -
host:devices-lreturns a more verbose list of all detected devices with their serial number, current connection status and banner string. -
host:wait-for-anywaits until any device has come online. -
host:get-statereturns the connection state of the only attached device. -
host-serial:1234:get-statereturns the connection state of the attached device with serial number “1234”. -
host:get-serialnoreturns the serial number of the only attached device. -
host-serial:1234:get-serialnoreturns the serial number of the attached device with serial number “1234”. This seems somewhat redundant. -
host:get-devpathreturns the device path for the only attached device, e.g.usb:1-1.2. -
host-serial:1234:get-devpathreturns the device path for the attached device with serial number “1234”. -
host:transport-anyselects the only device as the target for all future device-specific commands. -
host:transport:1234selects the device with serial number “1234” as the target for all future device-specific commands. -
reboot:tells the selected device to reboot normally. -
reboot:bootloadertells the selected device to reboot into the Bootloader menu. -
reboot:recoverytells the selected device to reboot into Recovery mode. -
root:tells the selected device to restart its Daemon in root mode. This is disabled on production devices like the bq Aquaris E4.5 Ubuntu Edition. -
usb:tells the selected device to restart its Daemon in USB mode. -
tcpip:porttells the selected device to restart its Daemon in TCP/IP mode listening on portport. After this command the Daemon is no longer accessible via USB. -
host:connect:address:porttells the Server to connect to the device ataddresslistening onport. -
shell:commandswitches to stream mode and choosesshell:commandas the destination. -
sync:switches to stream mode with the file synchronization service as the destination. This stream mode has its own sub-commands likeSTAT,SENDandRECV. -
host:forward:local-port;remote-porttells the Server to create a TCP/IP port forwarding between local portlocal-portand remote portremote-port.
There might be other commands as well.
A Client side protocol example
The following Ruby code (inspired by Tetsuyuki Kobayashi) will execute shell:ls on the only attached device and return its output:
require 'socket'

def send_to_adb(s, msg)
  s.printf("%04x%s", msg.length, msg)
end

def check_okay(s)
  code = s.read(4)

  if(code == "OKAY")
    return true
  else
    len = s.read(4)
    msg = s.read(len.hex)
    puts "FAIL: " + msg
    exit 1
  end
end

hostname = 'localhost'
port = 5037

s = TCPSocket.open(hostname, port)

send_to_adb(s, "host:version")
error_exit if ! check_okay(s)

puts "Version: " + s.read(8)

s.close

s = TCPSocket.open(hostname, port)

send_to_adb(s, "host:transport-any")
error_exit if ! check_okay(s)

send_to_adb(s, "shell:ls")
error_exit if ! check_okay(s)

while line = s.gets
  puts line.chop
end

s.close
This produces the following message flow:
Server> 000chost:version
Daemon> OKAY0004001f
Server> 0012host:transport-any
Daemon> OKAY
Server> 0008shell:ls
Daemon> OKAYDocuments  Downloads  Music  Pictures  Videos
Client command line
Luckily you don’t ever have to care about these two protocols because there is a client binary which has parameters for most functionality. The following part lists the most important ones. Some commands directly map to a Client protocol command, others have been implemented via the shell destination.
The -s parameter must be used to specify the serial number of the intended device when more than one is present.
Start or kill the local ADB server (the client will automatically try to start one if it doesn’t find one):
adb start-server
adb kill-server
Block until a device comes online:
adb wait-for-deviceList the detected devices:
adb devicesList the detected devices (more verbose):
adb devices -lGet the state of the device:
adb get-stateGet the serial number of the device:
adb get-serialnoGet the device path of the device:
adb get-devpathContinuously print the status of the device:
adb status-windowCopy a local file or directory to the device:
adb push /local/path /remote/pathCopy a file or directory from the device:
adb pull /remote/path
adb pull /remote/path /local/path
Copy a file or directory from the host, but only if the source is more recent than the target:
adb sync
adb sync /local/path
Start an interactive shell:
adb shellExecute a command using the remote shell and exit after it has finished:
adb shell <command>If you know better and/or something has changed, please find me on Launchpad.net and do get in contact!